One of the first things you should do when starting an arcade control panel design is to determine the layout of your joysticks and buttons for each player. When you look at example control panels on the web, you’ll see all kinds of button counts and configurations. The important thing is to think about what are your needs and then actually experiment to see what feels most comfortable to you. Other people’s opinions are great, but you are the one who will live with the arcade.
Determine the Number of Buttons
Many people use 6-8 buttons for players 1 and 2 on a custom arcade, and up to 6 buttons for players 3 and 4. The button count you actually need depends on the types of games you will be playing. If you will only be playing classic arcade games, you don’t need more than 6 buttons for players 1 and 2, and 4 buttons for players 3 and 4. There are very few classic 4-player games out there that use more than a couple buttons.
If you will be playing newer games and wish to future-proof your arcade, you could go with 8 buttons for players 1 and 2, and 6 buttons for players 3 and 4. That should cover almost anything that is available and is what I chose.
Modern console controllers generally have 8 buttons on them, so an 8-button count for players 1 and 2 will cover any console games that are playable on an arcade control panel. That being said, most are not playable on an arcade control panel due to them needing dual sticks, only found on controllers.
Some newer 4-player games like Streets of Rage 4 can use 6 buttons, and is a reason I chose that many for my arcade’s players 3 and 4.
Select a Button Layout
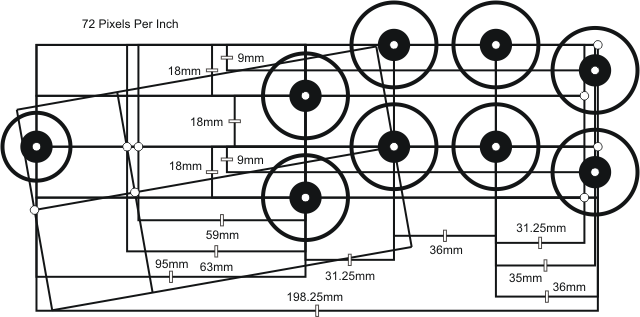
This Slagcoin Panel Layout page is an immensely helpful resource since they have done all the work of measuring and cataloging all common button layout designs. Choose two or three that look appealing to you.
Here’s an example named Clustered Arcade Layout:

Many layout designs show a single option, but there are actually three options in this particular screenshot, with all three variations being for the vertical position and slight horizontal offset of the rightmost buttons. I personally like the middle (displayed) option best, but many people like the option where the rightmost buttons align vertically with the second and third columns of buttons.
Test Out the Design
Once you’ve selected several button layout designs, it’s time to test them and narrow it down to one layout design. There are a couple ways you can test the layout designs.
Print the Button Layout
The easiest way to test a layout design is to simply print it at 100% scale on a piece of paper. Place the paper on a table and put your fingers over the button circles and pretend you are playing a game. Do your fingers rest comfortably in a natural idle position? Are you able to easily reach all of the buttons? Choose the layout design that works best for you.
Mount Real Buttons on Wood or Cardboard
If you have real arcade buttons laying around, an even better way to test the layout design is to get a scrap wooden board or cardboard, and drill holes into it a the positions indicated by the layout design.
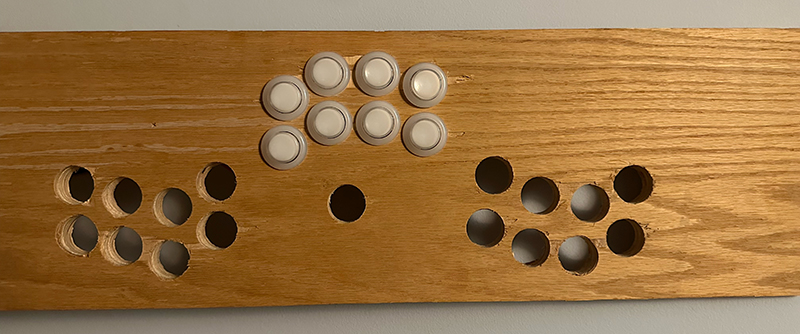
To create my test wood board, I taped a layout design on the board. I then placed a nail setter over each hole’s center on the paper and used a hammer to make a depression in the wood at that point to mark the holes’ centers. I used a 28mm drill bit and drilled through the wood at each hole’s center. Then I inserted the arcade buttons and placed the test board’s edges on a surface where I could use the buttons as if they were on a real arcade cabinet. This methodology is the truest way to determine if you will be happy with a button layout design since you are interacting with real buttons.

In my test wood board (a.k.a. FrankenBoard), I drilled holes for multiple layout designs. After trying them all, it was very clear to me which one I should select.
Summary
I ended up picking the Clustered Arcade Layout design displayed in the Slagcoin example above, with the rightmost buttons in the displayed middle positions. My fingers fit very naturally on all of the top row buttons and my thumb rests on the bottom leftmost button.
For my players 1 and 2 control areas, I will use all 8 buttons. My players 3 and 4 control areas will only use 6 buttons, basically by excluding the rightmost two in the layout design but otherwise retaining the same positioning.
In the next post, we will select controls to purchase for the control panel and will design the control panel layout.
