I’m a software developer and have always loved video games. I have fond memories of visiting arcades as a child and have owned a number of console gaming systems. While I appreciate the simplicity of classic retro games, I also love more modern PC and console games such as those you can purchase through Steam or get through the Microsoft Game Pass. I’ve been following the work of MAME and other emulators off and on over the years and always wanted to have an arcade cabinet of my own to play games with family and friends.
Cabinet Kind
Traditional arcade cabinets are great, but they typically have smaller displays, mediocre sound, and feel cramped. Sure, you can purchase pre-made systems from vendors that are larger and boast the latest tech. But by the time you deck them out with features, you could be hitting around $10,000 for a four-player system. I also feel like if the arcade cabinet sits on a wall in the basement, it won’t get much use.
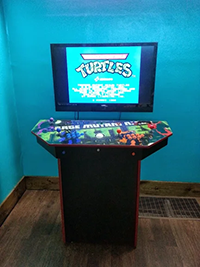
That’s when I came across the concept of an arcade pedestal. A pedestal typically has a lower cabinet that can fit a PC, and a full-size control panel, but there’s nothing above that. The idea is that you can hook the pedestal up to any TV and home theater system. Playing arcade games on a 65” TV with surround sound is something that really appeals to me. If it is set up on casters, it can be moved into the middle of the room when in use and wheeled away when not. This kind of cabinet is perfect for my needs.
Computer Kind
There are several computer options for running games.
Raspberry Pi
Raspberry Pi systems are very inexpensive and can handle running emulators for many older games. If you are only into retro gaming, they are a perfectly good option. However they don’t have the horsepower or the operating system to run more modern games, and it would be tricky to support some advanced features I’d like to do with the cabinet.
MiSTer FPGA
The MiSTer project is really exciting because it uses FPGA hardware to perfectly emulate classic arcade machines and systems. Any games that run on MiSTer behave exactly as they were originally intended, which is a huge plus. That being said, the hardware used at the time of this writing is limited to supporting nothing newer than the PSX generation of systems. This option would also limit what advanced features I could do with the cabinet itself.
Windows PC
Finally we come to the Windows PC. Windows systems can run pretty much anything, given you have enough horsepower. Nearly all emulators and other arcade-related apps run on Windows. In addition to retro games, I would be able to purchase the latest modern titles from Stream, Epic Games, Game Pass and use them on the PC. I also work in Windows software development and know the operating system inside and out. Taking all these things into consideration, using a Windows PC for my cabinet is clearly the best option for me.
Building Options
There are three options for building an arcade cabinet.
Pre-Made from Vendors
The first option is to find a vendor such as Extreme Home Arcades, Paradox Arcade Systems, or Retro-Cade that makes pre-built systems. The problem is that most vendors of this type only produce full-size arcade cabinets, and not many have a pedestal product. Most of these come fully-assembled and will be of the highest quality. This is the most hassle-free option, but also the most expensive.
DIY Kits from Vendors
The second option is to find a vendor like North Coast Custom Arcades or Game Room Solutions that makes DIY (Do It Yourself) kits where they ship you all the wood pieces, hardware, T-molding, etc. and you follow instructions to assemble it. Some kits may optionally include all the controls. This is more of a middle-ground option, and would require you to work to assemble everything. The final result is often close to a pre-made cabinet.
Custom Build
The third option is to design and build the cabinet yourself. This requires CAD software skills and having access to someone who can do precision CNC cutting of wood for you. While you can cut all the wood yourself, the end result is often not as clean as having a machine cut it. This option is by far the most work, but is the cheapest. The final result may vary wildly based on your skills at design and carpentry.
What I Chose
While there are a number of pre-made and DIY pedestal cabinets available, I wasn’t totally happy with any of them. Some of them don’t offer enough room in the base for a full PC. I also want to really do some crazy things with this cabinet, instead of only having the standard vanilla control cutouts in the control panel.
In the end, I felt like it would be a fun project to try and do a custom build. And to seek out some companies to help with certain parts of the build.
To recap, my plan is:
- Go with a pedestal arcade design, with casters for mobility.
- Use a Windows PC.
- Custom design and build the cabinet.

Pedestal arcade example from Instructables
This is going to be painful. While I am very good with software, I am a complete novice with woodworking and electrical components. I’ll do my best to document everything as I go so that it might help out others. Let the journey begin!
In the next post, we’ll plan a joystick button layout.
